Onsite Gearbox Inspections
Although a comprehensive on-site gearbox inspection will be carried out by a trained Gearbox
Technician.
Inspection will be worked in to fit in with planned shutdown period time might be perceived as prohibitive by management, but catching a problem in its earliest stages can save time and money in the long run. While it may seem too difficult to do a comprehensive inspection, a simple visual inspection of gear contact patterns through an inspection port can prevent future catastrophic failures. Geared engineering will perform the inspection and record pertinent data.
Overcoming constraints in order to allow an inspection can help to extend gearbox life and avoid catastrophic failure. This might save time, money, injury to personnel and damage to adjacent equipment.
An outline of Geared Engineering procedure is outlined below
Description of the equipment and techniques necessary to perform on-site gearbox inspections.
Preparation
Before beginning an inspection, inspection forms for documenting observations. Can be modified to suit specific applications.
Good Housekeeping is Essential
There are several sources of gearbox contamination, including those that are built-in, internally generated, ingressed and added during maintenance. Many gearboxes operate in dirty environments. Therefore, good housekeeping methods should be used during inspections. Areas around inspection ports and other openings should be cleaned before they are opened. Inspectors will take care not to drop anything into the gearbox. Shirt pockets will be empty, and tools should be stored in a tool belt. Ports will not left open during breaks and should be closed and secured after the inspection is complete.
Walkaround Visual Inspection
A thorough external examination before the gearbox inspection port is opened. Use an inspection form to record important data once cleaning is completed.Before cleaning the exterior of the gear housing, inspect it for signs of overheating, corrosion, contamination, oil leaks and damage. Measure the tightening torque of structural fasteners that carry significant loads such as torque arm bolts. Look for evidence of movement including cracked paint or fretting corrosion at structural interfaces. Note the condition of the fasteners and inspect load-bearing surfaces of components for fretting corrosion or other evidence of movement.
Detecting Overheating
The following are signs of overheating:
- Smoke from shafts, seals or breathers
- Discolored or burnt paint on housings
- Water sprayed on the housing or shafts evaporates quickly, boils or crackles
- Temper colors on unpainted surfaces
- Melted plastic components such as shipping plugs
- Low oil level in sight glass or on dipstick
- Dark oil in sight glass or on dipstick
- Foam in sight glass
- Water in sight glass or sludge on filter element (may indicate oil cooler failure)
- Metal chips on magnetic plugs, chip detectors or filters (may denote gear or bearing failure caused by overheating)
Methods for Inspecting a Gearbox
- Visual walkaround
- Measure temperatureThermometers
- Resistance temperature detector (RTD) probes
- Thermography
- Borescope inspection
- Visual inspection through inspection ports
- Measure oil pressure
- Measure sound and vibration
- Inspect Filter Elements
- Inspect magnetic debris collectors
- Inspect magnetic debris collectors
- On-site analysis of lubricant
- Laboratory analysis of lubricant
- Magnetic particle inspection of gears
- Dye penetrant inspection of gears
- Documenting gear conditionWritten
- Sketches
- Photography
- Contact patterns
To help you detect overheating,Following checklist is used.
- Visually inspect the gearbox exterior for signs of overheating.
- Record temperatures from gearbox thermometers, thermocouples or resistance temperature detectors (RTDs).
- Measure oil sump temperature.
- For pressure-fed systems with an oil cooler, measure temperature at the gearbox oil inlet and outlet, as well as the cooler water inlet and outlet.
- Estimate gearbox housing and shaft temperatures using water spray.
- Survey the gearbox housing temperature by touching it with the palm of your hand and using temperature-sensitive paint, crayons and labels or a digital thermometer probe.
- Check the gearbox housing temperature using an infrared thermometer or infrared imaging camera.
- Analyze gearbox oil for signs of oxidation or thermal degradation using on-site and
laboratory tests. - Analyze gearbox oil using particle counters, spectrometric analysis and ferrography to detect wear debris.
- Inspect internal gearbox components through inspection ports for signs of overheating, misalignment, inadequate backlash, inadequate bearing endplay or oil oxidation.
- Measure gearbox sound and vibration and compare to allowable limits.
Inspect the Breather
The breather should be located in a clean, non-pressurized area away from contaminants. It should include a filter and desiccant to prevent ingress of dust and water. Also, ensure that the breather is shielded from water during washdowns.
Check Shaft Seals
Look for oil leaks at the shaft seals. If there are signs of oil leakage, the seals are probably allowing ingression of dust and water. If the gearbox has labyrinth seals, it should have external seals such as V-rings to prevent contaminant ingression.
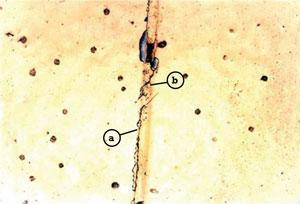
Figure 1. Cracked paint at the torque arm interface indicates movement
(a). The 45-degree direction of the cracks (b) suggests the component on the right moved downward relative to
the component on the left.
Inspect Structural Interfaces
Figure 1 shows cracked paint at an interface, which indicates there was movement. The 45-degree direction of the cracks suggests the component on the right moved downward relative to the component on the left.
Examine Through Inspection Ports
Examine the inspection port cover and determine whether all bolts are tight and the cover is properly sealed or if there is oil leakage. Only qualified personnel should be allowed to open inspection ports. In some cases it is necessary to secure the ports with padlocks to enforce security.
Clean the inspection port cover and the surrounding area. Remove the cover, being careful not to contaminate the gearbox interior. Remove bolts and store them in a separate container so there is no chance they will fall into the gearbox. Observe the condition of the gears, shafts and bearings.
If the gears or bearings are damaged but still functional, management may decide to continue operation and monitor damage progression. In this case, the gear system should be continuously monitored. You should also make certain there are no risks to human life.
For critical applications, examine the gears with magnetic particle inspection to ensure there aren’t any cracks that prevent safe, continued operation. If there are no cracks, you should periodically perform a visual inspection and measure temperature, sound and vibration.
Collect samples of the lubricant for analysis, examine the oil filter for wear debris and contaminants, and inspect magnetic plugs for wear debris.
The best place to take an oil sample from a gearbox is as close to the gearset as possible. Using a minimess sample port with tube extension will allow you to mount the sample port in the drain and manipulate the tube so that it terminates exactly where you want it.
If cracks are found or the damage is severe enough to warrant removal of the gearbox, measure shaft coupling endplay and alignment before removing the gearbox. Note the condition and loosening torque of fasteners including coupling and mounting bolts. To check for possible twist in the gear housing, install a dial indicator at each corner of the gearbox and then measure
movement of the mounting feet as bolts are loosened. If there’s no twist, each indicator will record
the same vertical movement. If there is twist, calculate the twist from relative movements.
If no obvious damage is detected, document the condition of gears and bearings with photographs, sketches and written descriptions. Also, record gear tooth contact patterns for future reference
(see Recording Gear Tooth Contact Patterns section).
Equipment to Use for a Gearbox Inspection
- Toothbrush for contact patterns
- PT-650 Tooth Marking Grease for no- load contact patterns
- DYKEM layout lacquer for loaded contact patterns
- 6-inch medium mill bastard file for recording graphite contact tapes
- Drafting pencil with 2H lead for
- High-intensity LED flashlight
- Fiber-optic attachment for LED flashlight
- 6-inch metric/inch scale
- 3.5-inch magnifier
- 2-by-3.5-inch telescoping mirror
- 30X Panasonic Light Scope microscope recording graphite contact tapes
- Swiss army knife with scissors for recording contact tapes
- Scotch No. 845 Book Tape for recording contact tapes
- 0.03 mm and 0.04 mm shims
- Felt-tip paint marker
- Ear plugs
- Sweatband
- Toolbelt
- Metric/inch tape measure
- Tweezers
- Spatula
- Telescoping magnet
- Leatherman “super tool”
- Torque wrench
- Dial indicators with magnetic bases
- Inspection forms
- Lubricant sampling equipment
- Baggies and tags for specimens
- Micrometers
- Borescope
- DSLR camera with close-up flash
- Sound meter
- Vibration probe
- Digital thermometer
- Infrared thermometer or infrared imaging camera
Measure Gear Backlash and Shaft Endplay
Measure gear backlash by mounting a dial indicator so it is similar to a pinion tooth profile, block the gear to prevent its rotation and rock the pinion through the backlash.
To measure shaft endplay, mount a dial indicator at the end of a shaft and move the shaft in the axial direction. In most cases, this requires a fixture with a ball bearing on the central shaft that allows pushing and pulling the shaft while it is rotated to seat the bearing rollers.
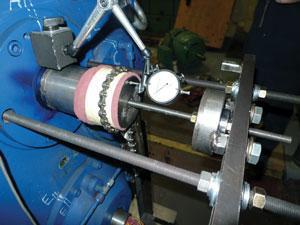
This fixture is used for measuring shaft endplay.
Gear Mesh Alignment
Gears have maximum load capacity when the gear shafts are perfectly aligned and the transmitted load is uniformly distributed across the entire active face width. Unfortunately, many factors such as design issues, manufacturing accuracy, deflections, thermal distortion and external effects may
combine to cause misalignment of the gear mesh. The result is that the gears are misaligned and the load distribution is not uniform.
Gear Tooth Contact Patterns
It is important to inspect gear tooth contact patterns because they can disclose gear mesh misalignment. The inspection should be done during commissioning of the gearbox to catch misalignment before it causes damage. Inspections should be regularly repeated to determine any changes in contact patterns caused by problems such as bearing failure.
What to Look for
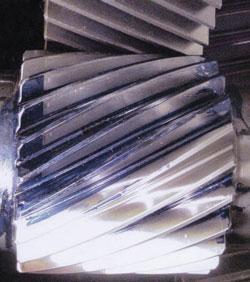
Watch for heavy contact at the edges of the contact area, especially at each end of the pinion and gear face, at the tips of the teeth and along the roots of the teeth at the start of active profile (SAP). Determine if there are wear steps at the tooth ends, tips or the SAP. The pinion is often wider than the gear, and if there is misalignment, a wear step is likely to be at either end of the pinion. Severe misalignment usually causes macropitting.
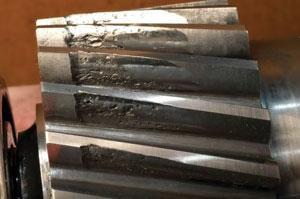
Severe misalignment can cause macropitting on helical pinion gears.
Recording Gear Tooth Contact Patterns
If there’s evidence of gear misalignment such as macropitting concentrated at the ends of the teeth but no broken teeth or other failures that would prohibit rotating the gears, record the gear tooth contact patterns. The way gear teeth touch indicates how they are aligned. Tooth contact patterns can be recorded under loaded or unloaded conditions. No-load patterns aren’t as reliable as loaded patterns for detecting misalignment because the marking compound is relatively thick. In addition, no-load tests don’t include misalignment caused by load, speed or temperature. Therefore, if possible, follow any no-load tests with loaded tests.
Recording No-load Contact Patterns
For no-load tests, thoroughly clean and paint the teeth of one gear with a soft marking compound and then roll the teeth through the mesh so compound transfers to the unpainted gear. Turn the
pinion by hand while applying a light load to the gear shaft by hand or a brake. Use clear tape to lift transferred patterns from the gear and mount the tape on white paper to form a permanent record.
The compound PT-650 Tooth Marking Grease from Products/Techniques Inc. works best. Scotch
No. 845 Book Tape (2 inches wide) is preferred for lifting contact patterns.
Figure 2 shows contact tapes that indicate a contact pattern wandering from centered in some sectors of the gear to biased toward the left end of the face width in other sectors. This type of misalignment is caused by runout of the gear. It can only be corrected by replacing the gear with a more accurate one.
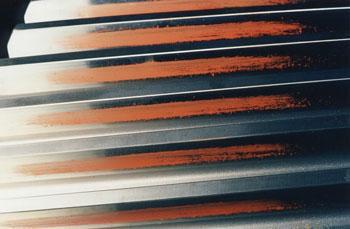
This image shows a no-load contact pattern transferred to an unpainted gear.

A different sector of the unpainted gear is revealed in this photo.
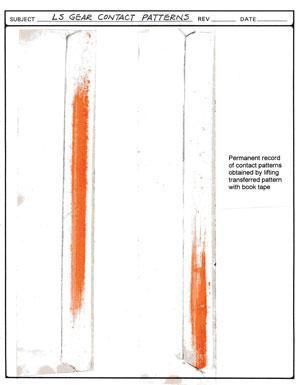
Figure 2. Documentation of no-load contact patterns.
Recording Loaded Contact Patterns
For loaded tests, thoroughly clean the teeth with a solvent and acetone. Paint several teeth on one or both gears with a thin coat of machinist’s layout lacquer (DYKEM). Run the gears under load for sufficient time to wear off the lacquer and establish the contact pattern. Photograph the patterns
to obtain a permanent record.
If possible, record loaded contact patterns under several loads, such as 25, 50, 75 and 100
percent of full load. Inspect the patterns after running about one hour at each load to monitor how the patterns change with load. Ideally, the patterns shouldn’t vary with load. Optimum contact patterns cover nearly 100 percent of the active face of the gear teeth under full load, except at extremes along tooth tips, roots and ends, where contact should be lighter as evidenced by traces of lacquer.
Think of on-site gearbox inspections as preventative maintenance. Problems caught early and corrected can prevent catastrophic, costly and dangerous failures down the road.
This pattern was recorded at 100 percent load.

This pattern was recorded at 50 percent load.
Recording Macropitting
A permanent record of macropitting can be obtained by painting teeth with marking compound and lifting the macropitting pattern with transparent tape. The procedure is:
1. Clean the tooth by rubbing with a clean, lint-free cloth soaked in fast-drying solvent.
2. Paint teeth with a thin coat of marking compound. The compound “PT-650 Tooth Marking
Grease” available from Products/Techniques Inc. works best.
3. Place a length of transparent tape over the entire tooth. Allow the tape to fold over the edges and topland to define boundaries of the tooth. Scotch No. 845 Book Tape is preferred.
4. Rub the back of the tape with a clean cloth to ensure intimate contact with the tooth surface.
5. Starting at one end, carefully peel the tape from the tooth.
6. Place one end of the tape (with adhesive side down) on white paper and carefully spread the tape across the paper. Macropitted areas will appear white.
7. Annotate the record to fully describe tooth location and orientation.
Recording Micropitting
A permanent record of micropitting can be obtained by rubbing fine graphite into micropitted areas and lifting the graphite pattern with transparent tape. The procedure is as follows:
1. Clean the tooth by rubbing with a clean, lint-free cloth soaked in fast-drying solvent.
2. Place a clean lint-free cloth on a flat surface and rub a drafting pencil on a file or sandpaper to coat the cloth with graphite.
3. Rub the entire tooth surface with the cloth so graphite covers micropitted areas, topland and edges of the tooth.
4. Rub the entire tooth surface with a clean lint-free cloth to remove loose graphite.
5. Place a length of transparent tape over the entire tooth. Allow the tape to fold over the edges and topland to define the boundaries of the tooth. Scotch No. 845 Book Tape works best.
6. Rub the back of the tape with a clean cloth to ensure intimate contact with the tooth surface.
7. Starting at one end, carefully peel the tape from the tooth.
8. Place one end of the tape (with adhesive side down) on white paper and carefully spread the tape across the paper. Micropitted areas will appear as dark gray, machining marks as lighter gray and polished areas will look white.
9. Annotate the record to fully describe tooth location and orientation.
